Studio Photography/Lighting
Studio photography is when you take photos of a subject
/model in a studio instead of a place that is public with allot of people, but
at the same time studio photography can improve your skills, how? It helps with
your lighting positions you would always learn something new to improve photos
by experimenting with the lights and making your photos look perfect to your
standards.
Flash heads
 The Flash Heads are a
really great tool to use while taking photos in the studio; in my case I think
it’s great for modelling because you can have two flash heads that can by
triggered by another without have to set it up but to make that happen you have
to have your camera connected to the flash by using a wire that automatically
set of the flash giving you photos a great look.
The Flash Heads are a
really great tool to use while taking photos in the studio; in my case I think
it’s great for modelling because you can have two flash heads that can by
triggered by another without have to set it up but to make that happen you have
to have your camera connected to the flash by using a wire that automatically
set of the flash giving you photos a great look.
Umbrellas
flash
 Umbrellas
flash is one most standard forms of lighting accessory. The flash is directed
into the brolly so that the light can be reflected back on to the subject
becoming softer. It can be used in many different colours such as white gold
silver and typically.
Umbrellas
flash is one most standard forms of lighting accessory. The flash is directed
into the brolly so that the light can be reflected back on to the subject
becoming softer. It can be used in many different colours such as white gold
silver and typically.
Soft-boxes
Soft-boxes
simple and useful they create a softer and gentler look to used for more for
flattering the subject with more of an illumination. The soft-boxes can be used
to flash or as a continuous light sources that use bulbs such as tungsten bulbs
or fluorescent lamps. There are also many types different soft boxes such as
the generic 43 inch umbrella soft boxes, photo flex 24x32 inch soft, the
Elinchorm 39 inch deep Octa and many more different soft-boxes in different
shapes and sizes that all give their own unique reflection that is left behind
within the eyes of the subjects if examined closely.
Reflectors
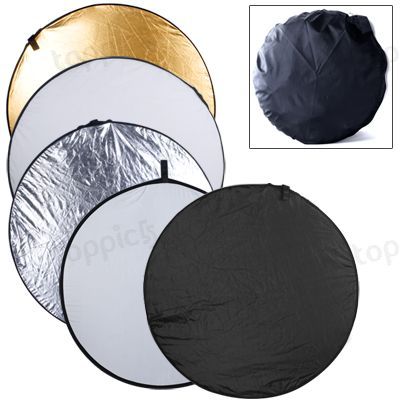
Reflectors
are very simple and useful in the studio and outside especially if you are
using one light in the studio or sunlight outdoors. They bounce light back onto
the subject to fill the hard shadows that are in the way. All it really is just
so white card bored or colour that reflect light well.
Beauty dish

A beauty dish is a
lighting device that distributes light to the focal point it acts as a
reflector but works in different ways. First they are much larger then
reflectors the normal size range for a reflector is 7 to 16 inch diameter but
beauty dishes are 22 inch in diameter. Second mostly all beauty dishes’ have an
opaque cover. The cover is to prevent light from the canter of the beauty dish
directly hitting the
Subject, the result of
this is that the light is bouncing off the beauty dish and not just a direct
flash hitting the subject but a softer light then a standard reflector.
Studio light
Clam shell lighting:
 The Clam Shell is a really easy lighting to do I think this
lighting is really great for beginners who are just starting studio but to give
your photo a really detailed look to it like the photo you see on the left all
you need is two soft –boxes on each side of the model/subject and the
model/subject in the middle near the lights and have the angle the same way
then a reflector to fill in the shadows just to give the model and bit of
shadow on the left side of her face and the best thing about this is you can
have it taken in door or outdoors so you don’t always need a studio to do this.
The Clam Shell is a really easy lighting to do I think this
lighting is really great for beginners who are just starting studio but to give
your photo a really detailed look to it like the photo you see on the left all
you need is two soft –boxes on each side of the model/subject and the
model/subject in the middle near the lights and have the angle the same way
then a reflector to fill in the shadows just to give the model and bit of
shadow on the left side of her face and the best thing about this is you can
have it taken in door or outdoors so you don’t always need a studio to do this.
Rim lighting:
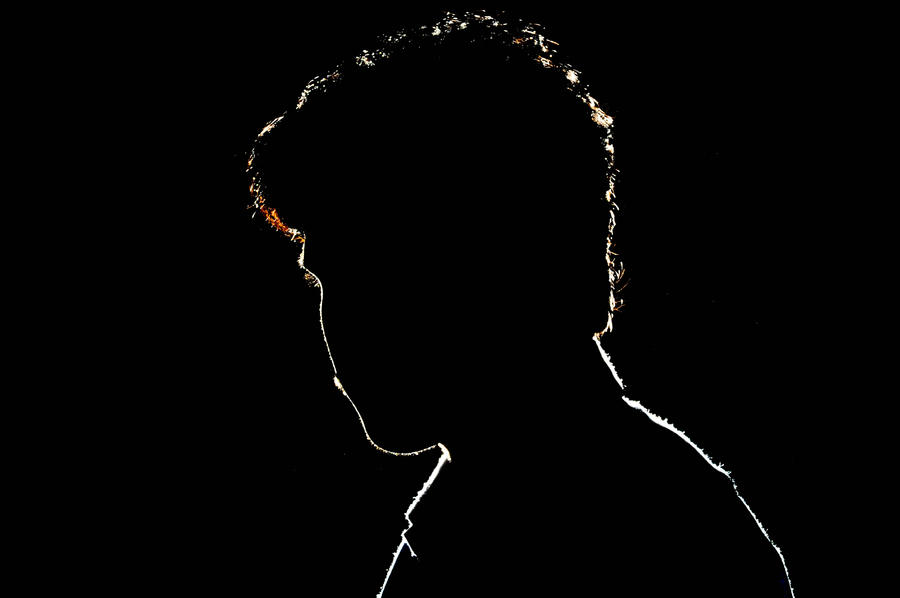 Rim lighting is mostly used for a stylish photograph that
can impact the viewers, how you do this is first you need to have a light that
is placed slightly behind the subject/model but it needs to be and needs to be
pointing towards the camera so it so you don’t see the face only outline of the
subject/model but before you get it perfect you need to play around with the
lighting and camera but you also need to find away to get it in the right angle
but once you get it to your standards it will work pretty well.
Rim lighting is mostly used for a stylish photograph that
can impact the viewers, how you do this is first you need to have a light that
is placed slightly behind the subject/model but it needs to be and needs to be
pointing towards the camera so it so you don’t see the face only outline of the
subject/model but before you get it perfect you need to play around with the
lighting and camera but you also need to find away to get it in the right angle
but once you get it to your standards it will work pretty well.
Rembrandt lighting:
 Rembrandt lighting is named after a old painter Rembrandt
what he use to do is in most of his paintings he use to have the one side of
the subject/person his painting left or right face dark so it almost looks as
if there is a really dark shadow on the left or right side of the face and that
is how Rembrandt Lighting is used today but instead its more technical with
something called light set ups, how to make a photo similar to Rembrandt
painting all you need to do is have you subject/model in a stance that has one
part of the models face dark on the left hand side and a light one the right
hand side, that makes the model have one side of the face lighter than the
other and the other side really dark but what I like about this lighting setup
is that if you bet it right you can actually get a little sparkle one of your
models eyes and that gives the perfect look to you photo.
Rembrandt lighting is named after a old painter Rembrandt
what he use to do is in most of his paintings he use to have the one side of
the subject/person his painting left or right face dark so it almost looks as
if there is a really dark shadow on the left or right side of the face and that
is how Rembrandt Lighting is used today but instead its more technical with
something called light set ups, how to make a photo similar to Rembrandt
painting all you need to do is have you subject/model in a stance that has one
part of the models face dark on the left hand side and a light one the right
hand side, that makes the model have one side of the face lighter than the
other and the other side really dark but what I like about this lighting setup
is that if you bet it right you can actually get a little sparkle one of your
models eyes and that gives the perfect look to you photo. 
The buttery lighting was named after a butterfly look that a
photo had that looked similar to a butterfly like shape shadow under the nose
of the model and all this is by placing the light itself behind the camera that
was high enough so the light is shining on the models head, the photographer
has to take the photo in a certain way so his/she’s is taking the photo under
the light course and that creates the butterfly effect on the models face in the
photo, the butterfly lighting gives off a more glamour look and if you take it
right you’ll get a shadow under the cheek and chin of the model.
Loop lighting:
 Loop lighting is really simple in my eyes and I think it
would make a good photo for photographers that take photos in the studio, how this
is done is you need to have the light you’re using to a certain level I would
say have it at 45 to 30 degrees from the camera so you can get that small shadow
between the models/subject nose on to the cheek bone, but at to be honest it
really depends on the models face.
Loop lighting is really simple in my eyes and I think it
would make a good photo for photographers that take photos in the studio, how this
is done is you need to have the light you’re using to a certain level I would
say have it at 45 to 30 degrees from the camera so you can get that small shadow
between the models/subject nose on to the cheek bone, but at to be honest it
really depends on the models face.
Split lighting:
 Split lighting is a
great way to take photos, usually its used for male models more than female
models because it brings out the more dramatic look on the photo and that is
what I think people like about the split lighting that is just my opinion on it
but how to do this look is really simple, all you do is have a light on either
side that is focused on the side of the models face and make sure that the
other side is really dark so you can’t see the models eye on the darker side of
the photo.
Split lighting is a
great way to take photos, usually its used for male models more than female
models because it brings out the more dramatic look on the photo and that is
what I think people like about the split lighting that is just my opinion on it
but how to do this look is really simple, all you do is have a light on either
side that is focused on the side of the models face and make sure that the
other side is really dark so you can’t see the models eye on the darker side of
the photo.
My Photos:
 In this photo I decided to use the Split
lighting as you can tell on one side of the subject/Models face one side is
more darker than the other side and that is because of the light is mainly
focused on the my left hand side of his face, what really catches my eye on
this photo is how serious his face is and in my eye’s it really brings out the
effect in the photo and the effect serious his face is and in my eye’s it
really brings out the effect in the photo and the effect is that it brings an
impact to the viewer.
In this photo I decided to use the Split
lighting as you can tell on one side of the subject/Models face one side is
more darker than the other side and that is because of the light is mainly
focused on the my left hand side of his face, what really catches my eye on
this photo is how serious his face is and in my eye’s it really brings out the
effect in the photo and the effect serious his face is and in my eye’s it
really brings out the effect in the photo and the effect is that it brings an
impact to the viewer. This photo is a
loop lighting photo that I've taken by mainly focusing on the near right side
of the face but at the same time it brings a really detailed shadow under the
chin, just over the eye and at the side of the nose, I think the lighting I've
used brings out a really detailed photo that really brings out the colour of
the badges on the subject/models inner jacket but at the same time I think would
catch the viewers eye.
This photo is a
loop lighting photo that I've taken by mainly focusing on the near right side
of the face but at the same time it brings a really detailed shadow under the
chin, just over the eye and at the side of the nose, I think the lighting I've
used brings out a really detailed photo that really brings out the colour of
the badges on the subject/models inner jacket but at the same time I think would
catch the viewers eye. This photo is Rembrandt lighting as you can see on the right had
side of the subjects/models face is really darker than the left hand side I
would of said it reminds me more of split lighting but the darker side isn't
really that dark because you can see the subjects eye and skin, I really like
how detailed the photo is and it really gives off a powerful look to the
viewers that in my point in view.
This photo is Rembrandt lighting as you can see on the right had
side of the subjects/models face is really darker than the left hand side I
would of said it reminds me more of split lighting but the darker side isn't
really that dark because you can see the subjects eye and skin, I really like
how detailed the photo is and it really gives off a powerful look to the
viewers that in my point in view. 
 This Photo is loop lighting what really attracts me about this photo is
that you can see so much detail in the models/subjects eye, the reason why I
said its loop lighting is because you can just about see the shadow in between
the models/subjects nose and a bit on the cheek bone but you can’t really see
it on the cheek bone
This Photo is loop lighting what really attracts me about this photo is
that you can see so much detail in the models/subjects eye, the reason why I
said its loop lighting is because you can just about see the shadow in between
the models/subjects nose and a bit on the cheek bone but you can’t really see
it on the cheek bone because of how the subjects/models cheeks, I think this is photo would attract the subjects eyes because on how you can see how much detail this model/subjects face and eye’s are.
 This lighting right here is clam shell lighting because how bright the
middle upper part of the eye is lit up and it bring the colour out very well,
what catches my eye about this photo and what I think would catch the viewers
eye’s is how detailed the eye is more than anything else because as you can see
on the left hand side it starts to blur out and the more you look towards your
right it gets really detailed but the best thing about the eye of this
subject/model is that you can see the light in the eyes and it sort of look
like a flower and that why I think this would catch the viewers eye.
This lighting right here is clam shell lighting because how bright the
middle upper part of the eye is lit up and it bring the colour out very well,
what catches my eye about this photo and what I think would catch the viewers
eye’s is how detailed the eye is more than anything else because as you can see
on the left hand side it starts to blur out and the more you look towards your
right it gets really detailed but the best thing about the eye of this
subject/model is that you can see the light in the eyes and it sort of look
like a flower and that why I think this would catch the viewers eye.